Introduction
Docker is amazing – period. Having used Docker in personal and professional settings has been incredibly useful. The big idea here is that if an application can be “containerized” using Docker, it can run anywhere the Docker engine is installed. Most importantly, and interestingly, Docker containers can be configured to run just about anything. NodeJS, Python, Java, WordPress, heck, even an entire Ubuntu operating system can be crammed into a container and run on the Docker engine.
If you’re familiar with Docker, you’re also familiar with another problem and unique solution Docker implements.
The problem? Docker containers can take a long time to build.
The solution? Docker caches each “layer” of the build process so each build step is idempotent and doesn’t need to be repeated.
But what if you need to cache the entire image for replication purposes and to speed up your CI/CD pipeline? Well, Docker has some functionality to save a built container and its cached layers for you to simply import it – here’s where our focus will be for this guide.
What if you found a store of Docker caches? What can you do with that? Can you tamper with them for your own exploitation? Let’s explore.
Docker Introduction and the Docker Build Process
This section will focus on basic Docker principles and concepts as they’re relevant to this attack vector of “poisoning”. If you’re familiar with Docker already, feel free to skim this section and skip ahead.
Docker is an engine that runs on most operating systems – Windows, Mac, Linux, whatever. A few quirks and nuances aside, one container built on Windows should run on any other platform running the Docker engine. Assuming you have Docker installed, let’s quickly make a “hello world” application in Python.
First, let’s create our main.py application with the following contents:
# main.py
print("Hello world!")
Next, we need a “Dockerfile”. A Dockerfile is a special file in Docker that instructs Docker on how to build the application:
FROM python  # specifies the Docker image you want to use

COPY main.py . # copy the main.py from our host machine into the container

ENTRYPOINT ["python3", "main.py"]  # the instructions to start our application
Easy enough, right? Now, let’s build the container:
$ docker build -t py:test .Assuming everything goes correctly, you’ll see the following output:
$ docker build -t py:test .
Sending build context to Docker daemon  2.825GB
Step 1/3 : from python
 ---> 73381281305e
Step 2/3 : COPY main.py .
 ---> Using cache
 ---> 2058853be3b5
Step 3/3 : ENTRYPOINT ["python3", "main.py"]
 ---> Using cache
 ---> 1091e486dab1
Successfully built 1091e486dab1
Successfully tagged py:test
Running docker images in the terminal also shows you the images in your Docker daemon that can be run.
Finally, to run your container you can simply run docker run pytest:latest and you should see your “hello world” output. Congrats – you just built your first container!
Now, let’s talk about a few tings in the output above for building a container:
- The “Steps” are the steps you write in the Dockerfile
- Each “step”, once processed, is cached as part of the build process
- This is useful because if you import a large base image but only change your application, Docker knows not to re-download the base image. It only copies over the modified application files which saves time on the build process – neat!
- At the end, the container is built using a truncated hash and tagged with your tag – we’ll come back to these later.
Going back to our original question at hand, what if we want to make this process even faster? Maybe you need a cached image to increase pods for availability purposes? Well, Docker has Devops fans covered.
Docker ‘save’ and ‘load’
The combination of save and load commands in Docker is interesting when used in junction.
Let’s say you have a perfect image you want to make readily available without re-building it each time, docker save allows you to save the built image as a tarball locally.
docker save py:test > py_test.tarNow, just load it using:
docker load --input py_test.tarThe image you saved simply gets imported into the daemon and is ready to be run! What’s even more interesting about this process is “what” is included in the saved tarball so let’s explore.
Unpacking Docker Tarballs
Let’s take our saved Docker tarball and unpack it:
pasquale@ubuntu-victim:~/Docker/cache$ tar xf py_test.tar -C test/
pasquale@ubuntu-victim:~/Docker/cache$ ls -la test/
total 68
drwxrwxr-x 12 pasquale pasquale 4096 Apr  5 15:13 .
drwxrwxr-x  4 pasquale pasquale 4096 Apr  5 15:13 ..
drwxr-xr-x  2 pasquale pasquale 4096 Apr  5 13:36 09478bcf6a304889bb037b4e038725817333a7d19f9acc448334decddb89d613
-rw-r--r--  1 pasquale pasquale 8969 Apr  5 13:36 1091e486dab153fd909ccd5a47665d2ea1fc9946c4a51bd0bb0ccd588353e9e8.json
drwxr-xr-x  2 pasquale pasquale 4096 Apr  5 13:36 3479cee7c2bcac0b4482bb2f1919c7ff3009aa3c790f12ee1e36bc82c833cd81
drwxr-xr-x  2 pasquale pasquale 4096 Apr  5 13:36 6ff02019a5ef57660e3ed0d9a11698bca7aded4b6c41fac8e3fc10fc6726c356
drwxr-xr-x  2 pasquale pasquale 4096 Apr  5 13:36 74cbe2f8ecb09a897418d26e2d47aff4c18f798eb1288f463e0e0dacb73368cf
drwxr-xr-x  2 pasquale pasquale 4096 Apr  5 13:36 8adb55a90739219017f8eeeea6ef65638e40ad167a51197692deaa25f6908549
drwxr-xr-x  2 pasquale pasquale 4096 Apr  5 13:36 a84acbbbed823cf8ade8f68d4eef69c3c10292af01ecd94db5087743c25e6874
drwxr-xr-x  2 pasquale pasquale 4096 Apr  5 13:36 aab8664d5f07cee7d06370700c567017c1cb7c90eb8538ed26bb61ce29c18bc6
drwxr-xr-x  2 pasquale pasquale 4096 Apr  5 13:36 abbf03ec207bf9db14b8c1f0bfb9503c3f243af01b07057488bf9c0bdf60bb7b
drwxr-xr-x  2 pasquale pasquale 4096 Apr  5 13:36 bb7caa39c35e6cc5b806c425138f0b9e327b4bbbf6f21c03c825bc26f5e97a7b
drwxr-xr-x  2 pasquale pasquale 4096 Apr  5 13:36 d19a80c73af0aa362e0063cb99245f46fc4a33331273fcf943cc5fa402e117e2
-rw-r--r--  1 pasquale pasquale  889 Dec 31  1969 manifest.json
-rw-r--r--  1 pasquale pasquale   83 Dec 31  1969 repositories
Remember our truncated tag from earlier “1091e486dab1”? Look where it ends up, in the 1091e486dab1*.json file along with a bunch of other directories. Each directory also contains three files:
pasquale@ubuntu-victim:~/Docker/cache/test$ ls -la 09478bcf6a304889bb037b4e038725817333a7d19f9acc448334decddb89d613/
total 56380
drwxr-xr-x  2 pasquale pasquale     4096 Apr  5 13:36 .
drwxrwxr-x 12 pasquale pasquale     4096 Apr  5 15:13 ..
-rw-r--r--  1 pasquale pasquale      482 Apr  5 13:36 json
-rw-r--r--  1 pasquale pasquale 57716736 Apr  5 13:36 layer.tar
-rw-r--r--  1 pasquale pasquale        3 Apr  5 13:36 VERSION
We can ignore the json and VERSION for now, but once the layer.tar is interesting. If we extract every layer.tar file in our dumped cache, the resulting files should look very familiar to you because we have a unix/linux file system with our main.py included.
pasquale@ubuntu-victim:~/Docker/cache/test$ for i in `find . -name layer.tar -type f 2>/dev/null`; do tar xf $i; done
pasquale@ubuntu-victim:~/Docker/cache/test$ ls -la
total 148
drwxrwxr-x 31 pasquale pasquale 4096 Apr  5 15:17 .
drwxrwxr-x  4 pasquale pasquale 4096 Apr  5 15:13 ..
drwxr-xr-x  2 pasquale pasquale 4096 Mar 29 10:29 bin
drwxr-xr-x  2 pasquale pasquale 4096 Mar 19 06:46 boot
drwxr-xr-x  2 pasquale pasquale 4096 Mar 27 17:00 dev
drwxr-xr-x 46 pasquale pasquale 4096 Mar 29 10:30 etc
drwxr-xr-x  2 pasquale pasquale 4096 Mar 19 06:46 home
drwxr-xr-x  8 pasquale pasquale 4096 Mar 27 17:00 lib
drwxr-xr-x  2 pasquale pasquale 4096 Mar 27 17:00 lib64
-rw-rw-r--  1 pasquale pasquale   21 Apr  1 11:43 main.py
-rw-r--r--  1 pasquale pasquale  889 Dec 31  1969 manifest.json
drwxr-xr-x  2 pasquale pasquale 4096 Mar 27 17:00 media
drwxr-xr-x  2 pasquale pasquale 4096 Mar 27 17:00 mnt
drwxr-xr-x  2 pasquale pasquale 4096 Mar 27 17:00 opt
drwxr-xr-x  2 pasquale pasquale 4096 Mar 19 06:46 proc
-rw-r--r--  1 pasquale pasquale   83 Dec 31  1969 repositories
drwx------  2 pasquale pasquale 4096 Mar 30 16:46 root
drwxr-xr-x  3 pasquale pasquale 4096 Mar 27 17:00 run
drwxr-xr-x  2 pasquale pasquale 4096 Mar 29 10:29 sbin
drwxr-xr-x  2 pasquale pasquale 4096 Mar 27 17:00 srv
drwxr-xr-x  2 pasquale pasquale 4096 Mar 19 06:46 sys
drwxrwxr-x  2 pasquale pasquale 4096 Mar 29 10:29 tmp
drwxr-xr-x 11 pasquale pasquale 4096 Mar 27 17:00 usr
drwxr-xr-x 11 pasquale pasquale 4096 Mar 27 17:00 var
Poisoning the Entrypoint
To keep things simple, let’s zoom back out a little bit and focus on the “1091e486dab1*.json” file mentioned earlier. Also, to keep your eyes from being strained, I recommend formatting this file.
pasquale@ubuntu-victim:~/Docker/cache/test$ cat 1091e486dab153fd909ccd5a47665d2ea1fc9946c4a51bd0bb0ccd588353e9e8.json | jq > formatted.json
pasquale@ubuntu-victim:~/Docker/cache/test$ mv formatted.json 1091e486dab153fd909ccd5a47665d2ea1fc9946c4a51bd0bb0ccd588353e9e8.json
Now, open it up in your favorite text editor and take a look.
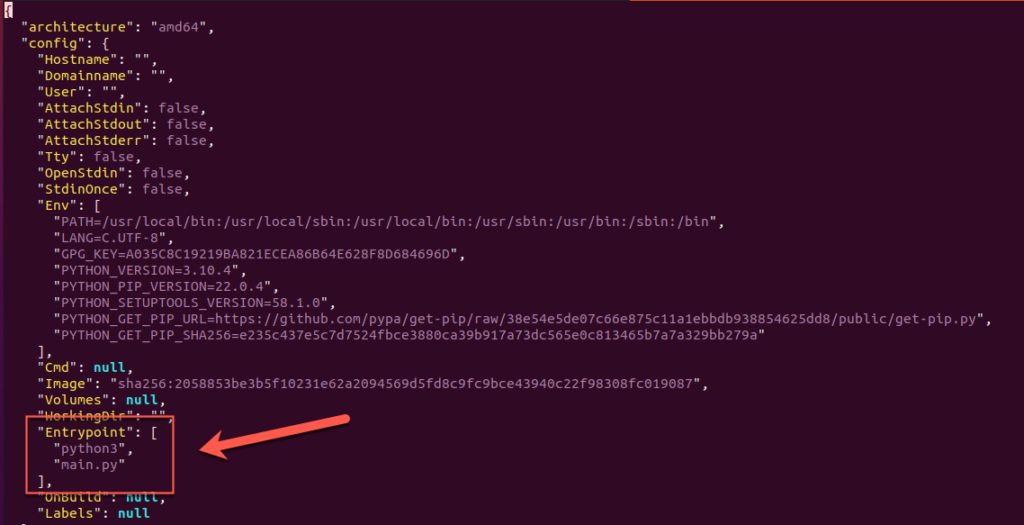
Within this file is all of the metadata that Docker needs in order to build and run your container. Environment variables, user, labels, and, most important for our purposes, the Entrypoint. The Entrypoint according to Docker’s documentation:
An
ENTRYPOINTallows you to configure a container that will run as an executable.…
Command line arguments to
https://docs.docker.com/engine/reference/builder/#entrypointdocker run <image>will be appended after all elements in an exec formENTRYPOINT, and will override all elements specified usingCMD.
In our case, our Entrypoint just calls python3 main.py to run our main.py executable.

So what if we swapped the instructions to something else and re-packaged the cached image? Sure, let’s do it.
- Modify the Entrypoint

2. Package up the cache into a new tar file
pasquale@ubuntu-victim:~/Docker/cache/test$ tar cf ../hacked.tar *3. Load the image into the Docker daemon
pasquale@ubuntu-victim:~/Docker/cache$ docker load --input hacked.tar 4. Run the container!

As you can see since the tags in the cache’s metadata matches the Docker image we built earlier, loading the image simply overwrites our original image with the malicious image all while calling our original py:test image label.
So what? I modified a container I own. What’s the real risk?
If the company you’re testing for is DevOps heavy, there’s a chance they may implement a similar mechanism for caching Docker images. Rather than building an image every time it needs to be deployed, it’s not out of the realm of possibilities a caching system like this would be implemented. This means that some service like Kubernetes will be fetching these caches to run them in their container workload. All this to say, if you control the Entrypoint then you control the first command that gets run when a container starts!
Here are some potential attack vectors I’d like to explore in future articles on this topic:
- Reverse shell within the running container
- If the container is improperly secured, this will run as
rootwithin he container
- If the container is improperly secured, this will run as
- Out-of-bounds exfiltration of environment secrets
- Ex: a docker image is run using
docker run -e secret=key py:test, you can grab environment variables
- Ex: a docker image is run using
- Run some other malicious script or replace the application entirely
Potential Mitigations
I’ll admit that researching this attack vector is in its infancy, however, I can recommend a few mitigations that should up this avenue for attack.
Secure your storage mechanism
First and foremost, lock down whatever you’re using to store Docker image caches. Whether it be in an S3 bucket, NFS, SMB share, or somewhere else on a machine, make sure access is limited to only the resources that need to read/write the Docker caches. Simple RBAC and/or network-based controls can go a long way here.
Validate and verify your images
While Docker implements its own checksum/verifications, that’s for caching its own build process and won’t secure you and your images from tampering. Assuming you have a service that fetches Docker images and loads them into the daemon, your services should also be verifying which images are being used. A great, simple way to accomplish this would be to use SHA-256 hashing with a workflow like this.
- Build the legitimate Docker image
- Save the legitimate image as a tarball
- Generate a SHA-256 hash of the legitimate tarball and store it somewhere securely
- Upon fetching the legitimate tarball to load into Docker, generate a SHA-256 sum of the image you’re importing to make sure it matches the one you’ve saved prior

Antivirus and Runtime Protection
While some options cost money, such as Palo Alto’s Prisma Cloud (formerly Twistlock), implementing simple antivirus can help mitigate risk. Whether it be signature-based or heuristics, when your container workload suddenly stops working the way it has been, monitoring can help catch issues at runtime.
Conclusion
To reiterate, a lot of this research is new but I really look forward to expanding on it more. So for now please take what you read here with a grain of salt when applying the attack vectors and risks to your own personal work.
